Showing posts with label Charted pattern. Show all posts

Thursday, December 24, 2009

Happy Solstice!

BadKitten and her Cousin Ben made us cookies to celebrate the season. They are getting very good in the kitchen, eh?
I wanted to bring all of you a gift for the holiday season, and what could be better than a hat? Quick to make, fun to wear and it chases the winter chill.

This pattern began life as a basic doily, which I shared for free. You might recognize Little Flower... Catherine Dunlap took the doily pattern and made a lovely hat, which she was kind enough to share with me. Her hat is made on larger needles than are in my comfort zone, so I reworked things for a finer gauge. Her hat is styled as a tam, with a decrease at twice the rate of the increase. My version is a classic beret. This pattern contains three charted versions. The first version is a beret in sock weight yarn. The second is a beret in DK weight yarn, and the third is Catherine’s original, a tam in DK weight yarn. Thanks to Catherine for generously sharing her concept! Special thanks to Mary Rose and Judith Gilbert.
BadKitten graciously humors her mother by showing off the light weight beret. I believe that she looks gracious...
I think she is getting a little fed up, but hiding it well...

Materials for Light weight Beret
-1 skein of Ella Rae Lace Merino 100gms/460 yards in color 103
-1 set of 5 US 2 double pointed needles (7 inches or longer)
-Yarn needle for weaving in ends
-12 inch dinner plate to block (optional)
Gauge:
7 stitches to the inch blocked in stockinette.

Materials for DK weight tam or beret
-1 skein of Baby Bee Sweet Delight Twist in color yellow
-1 set of US size 8 double pointed needles (7 inches or longer)
-Yarn needle for weaving in ends
-12 in dinner plate to block (optional)
Gauge:
5 stitches to the inch in stockinette.

Directions
-Cast-on 8 stitches to four double pointed needles and join in the round being careful not to twist.
-Work one round plain.
-Begin following the chart
-Repeat chart eight times for each round (twice per needle.)
-After completing your chosen chart, cast off loosely in ribbing.
-Soak in cool water and block to shape. You can use a 12 in plate to block the berets.

For those of you who have been with me for the long haul, you know what to do with the following pictures! Click on them and print in Landscape mode. First you have the chart key...

Second you have the chart for the light weight beret...


Finally you have the chart for both the DK beret and tam...


Here are Cathrine Dunlap's photos of the tam that she made. Here model is Lauren Ruff, who was kind enough to let us use her photograph.
You can see the shape in this picture.
And the front edge here...
Finally, you can see the original Little Flower right here!
Both Little Flower and now this remix are available as PDF files at my Ravelry Pattern Store. They are both free! If you want to know more about Little Flower, check this old post for details.
I wish all of you a wonderful, wonderful whatever you are celebrating. I hope it is filled with fiber and cookies!

Wednesday, August 5, 2009

Socks are nice...as long as they have lace on them.

I interrupt my usual programing to introduce a new sock yarn. Jade Sapphire Yarn Company just release Sapphire Sox. Here is the deal: 330 yards per skein, 25% Cashmere, 63% wool and 11% nylon. It comes in a bunch of interesting colorways, as you would expect from Jade Sapphire. The one they sent me is called Soul Mate...and I enjoyed the way that it striped. The yarn is soft but not delicate and was a pleasure to work with on a US 2 needle. I can't speak to wear, because I knit mine and JS took them as samples! With the nylon content and the nice twist, I suspect they will wear well. You can grab my pattern at the Jade Sapphire website or at my Ravelry pattern store. It is free. If you want the yarn, it will take a bit more effort. If you are lucky enough to be at The Sock Summit, there are two vendors there who have some. If not, ask for it at shops that carry JS yarn. They should be able to order it. Now I'll get back to knitting...

Friday, April 24, 2009

A BadCat Yarn Review!

I was recently gifted with a lovely selection of Crystal Palace yarns. A skein of this and a skein of that, in wonderful colors and assorted fibers. I pondered my loot and considered simple swatching, but there was something unsatisfying about just a swatch of such pretty yarn. I needed it to be something. Something I might wear, or give as a gift to my mom. Do you know what I mean? So I picked a skein of Panda Superwash and cast-on for a scarf. This scarf is not for winter warmth. It is more of a fashion accessory, if you will. The fiber content is 51% Bamboo, 39% Superwash Wool and 10% nylon. Although it has a bunch of wool in it, the feel is lighter and very silky, which is owes to the Bamboo. I would consider this yarn a nice one for warmer weather. The wool did show off when I blocked my scarf. It relaxed like wool in the water and the scarf is holding its block very well. The yarn was easy to knit, with very little splitting and no knots in my skein. This yarn would also be wonderful for socks, hats and mitts. The color I used is called Stonewash, and has short repeats of blue shades. The colors pool in a pleasant way and the finished piece looks great with jeans. I have more projects planned with some of the other skeins in this lovely collection, so look out for more patterns in these yarns in the future!
This shows the stitch detail. You can see the sheen of the yarn and the way the colors move. You can knit this scarf for yourself by casting on 30 stitches and following my chart. The gauge is 6 stitches to the inch in pattern but not critical. The finished size is 4 inches wide and 56 inches long after blocking, and I used one skein of Panda Superwash. If you want the pattern with full (line-by-line) directions and all the little details, download it from my Ravelry Pattern Store. It is free!


Until next week, knit on! I'll try not to get into trouble in the mean time...

Sunday, March 29, 2009

American Beauty, Take Six!

Thank you for waiting so patiently! I just returned from a little trip to heaven, and I feel fully restored. I hope to share my trip with you next week, along with a preview of all the things I worked on while traveling. In the mean time, we have some unfinished business! The photo above is the best one I have right now, but you can see how the project ends...
Here is the center/back, with my blocking suggestion. I ran a wire along the eyelets between the top edge of the shawl and the triangle. I pinned out each scallop along that top edge, and also each point along the two lower edges. I used a whole bunch of pins for the center back section.
And I pinned the fronts as above.

Posted by Picasa

Special instructions are noted on the chart, which should be printed in "portrait" today. Pay attention to these notes. I used double yarn-overs before and after each heart bead, to be sure there was enough yarn for the bead to lay properly. On the return row I dropped one of the loops from each yarn-over. You should consider the size of your beads the the size of your needles and determine if this is what you should do too. Also, for those of you using beads that have a top and a bottom, be sure you put them on with the correct orientation! Upside down hearts might not be what you have in mind, eh?

Ha! I forgot to add the cast-off didn’t I? Thanks, Deb! I used the following:
Knit 2, return both to left-hand needle, knit 2 together through the back.
*Knit 1, return 2 to left-hand needle, knit 2 together through the back* repeat!

I am now off to do laundry, shop and otherwise prepare for my upcoming return to work on Monday. This will include going through all of my travel pictures and paying excessive attention to LucyFur and Cap'n Flint.

As usual I long for photos of your finished projects, so once you block your shawls please send pictures along if you will allow me to share them on the up-coming "wrap-up" blog post. Use the following format:
Your name:
Your Blog or website:
Yarn used:
Needle used:
Finished size across top and down center-back:
Comments:
Send an email in the format above, along with a jpg or two, to:
BadCatDesigns@verizon.net

Until next time, knit and be merry!

Friday, March 13, 2009

American Beauty, Take Five!

And another happy Friday to all of you! I hope your week was better than mine, but enough said...

Today's post brings us to very nearly the end of our project. I will have one more set of charts, but they only cover a few rows, plus our cast-off. Those few rows are important, but brief! The remaining "meat" of our project is here today. I trust each of you decided either yes or no on the extra Chart A row sequence repeats. After looking over our chart today, you can make a final choice on that front.
Posted by Picasa

Chart C is broken into three parts. You must cover each of the three chart sections on each row. In other words, work the first row of the Right Edge, Center and Left Edge. This will take you across one row. Do not forget that we are still following the Edge Charts also. Please note that we no longer have that pesky center stitch. It is gone... Also note that on row 155, you will find a double yarn-over on either side of the Center Chart section. That is not an error. On the return row (156) you will purl into the first yarn-over, and knit into the second one. Enjoy!

Once again, if you are new to the party, please take the time to review all previous posts with the American Beauty tag. We are way into our process, but there is always time for you to join us.

I need some feedback. There is one final instruction post (after today) for this project. After that final instruction post, I will post finished photos (your photos and mine!) I can either post our final instructions one week from today or wait until April first. I am going away, so even if I post the final instructions, I won't be around to field questions. Do any of you have a strong need to see the end before April first? Post a comment and let me know. Until then, knit on!

Friday, March 6, 2009

American Beauty, Take Four!

Happy Friday! We are continuing on with our American Beauty project. If you are new to the party, please begin at the beginning, by following the "American Beauty" tag (see labels listed on left edge.) As you can see from my picture, we have one more week of rose buds. Chart B3 is the same as B2, but for the repeats, so pay special attention. You will work Chart B3 once through. After you finish, you can go back to Chart A and add repeats of rows 27-42 for a larger final piece. Note the row repeat section and the pattern repeat section. I can't tell you how many PATTERN (not ROW) repeats to do because I don't know how many ROW repeats you will do, so you have to make that determination yourself. After Chart B3, without extra Chart A row repeats, we will have a total of about 29 more charted rows (this is about 60 more total rows because only odd numbered rows are charted, eh?) You can measure your piece (down the spine) and see how many yarn-overs to the inch you are getting down the spine. Each yarn-over will stand for one charted row (or two rows.) This should help you decide if you want to do any Chart A row repeats.

So here you have Chart B3, and have a nice week knitting. If you are still not sure about adding extra chart A row repeats by the time you finish Chart B3, add a life-line so you can come back later. It is always good to keep your options open! Until next week, knit on!

Friday, February 27, 2009

American Beauty, Take Three!

It's Friday! I am glad to be ready to post our next chart, just in time for Happy Hour...at least in New York. You might notice that my picture is better this week. That has something to do with a little thing called blocking. I just love blocking lace knitting. I never know exactly what I will get, but I am almost never disappointed. This week our design is proceeding along without a real surprise. We have two more rose buds opening. I know that several of you finished last week's chart within hours of my post, but this week it might take longer, just because those darn rows are getting longer, right?

Posted by Picasa

Chart B2 follows Chart B1 without fanfare, so keep going! There are no row repeats this week. Do not worry. I have not forgotten about giving you the option to make your piece larger, but we are not there yet. If you are new to the party, please take some time to review all previous posts with the "American Beauty" tag, so you can catch up to us. Everything you need will be there! Until next week, knit a few more rose...

Saturday, February 21, 2009

American Beauty, Take Two!

I hope many of you have successfully worked the cast-on and Chart A, and are waiting for the next step. This week we are working on Chart B1. If you are new to the party, please take the time to review all previous posts with the "American Beauty" tag. Much of the basic information for this project has been posted already. Chart B1 is a continuation of our rose petals, with a stylized rose bud/heart at the center. Every Chart B1 row is worked twice. That is once for each side of our triangle. The edging charts continue repeating from our earlier charts without change. There are no recommended row repeats, so just knit through this new chart once.
Posted by Picasa

You will notice one of my favorite stitches in today's chart. We used the same maneuver for one of our Summer Sampler patterns. I did a step-by-step tutorial on the maneuver, and you can refer back to it if you need a refresher. You knitting should look something like mine (pictures above) when you finish Chart B1.
This will be a good time to do a gauge check. You can run a ruler along the "spine" of your piece to see how many rows per inch you are getting down the center back. This will help you decide how many rows you want to add or subtract from your project. Don't worry about it this week. We will get back to the idea in the future. Again, there are no extra rows to add this week.

I thought you might enjoy seeing a few on my birthday goodies. I admit that there were some other outrageous edibles and drinkables which are now gone, and I didn't get pictures. You will have to trust me when I say that they were very yummy.

I got these gorgeous spindles from myself, via Golding Spindles. They both have whorls that were hand painted in Russia. The smaller(lower) one is painted abalone on ebony. The picture on the whorl has a lot of depth which is hard to photograph. They are both for spinning lace-weight yarn.

I got a hand knit scarf from my darling daughter. Yes, there is a lace pattern she snuck in there!
I got this gorgeous pot and lovely hand lotion from my brother's partner.
I got beads and this chocolate from my sister and her family. I got a knitting kit from my friend Jane. I got a shopping trip from my mom and dad, which included an afternoon shopping and lunch with my mom. I refuse to model anything, but I got a few things that will be perfect for Barbados (more to come about that.)

Could it get any better? I don't think so, but I'll be back next week and we can discuss it... Until then, knit on!

Saturday, February 14, 2009

American Beauty, Take One

Are you ready for some Valentine's Day fun? Find yourself a quiet place and read this post carefully! There is a ton of information here, and you'll need it all to make the most of this project. If you are new to the project (or new to my madness) please be sure you read all previous posts with the American Beauty tag to get up to speed. The materials list and the Chart Key have already been posted.

Please start by printing out the charts. I suggest you click on each chart to make it larger, right click to copy the chart and save it to a Word document. If you do that with each chart, you can format the charts to re-size them. You can also set your printer function to print each chart as one page in landscape mode. MOST (but not all) of the charts will be in landscape. It should be obvious if they are or are not.

The first chart today is an overview of the first part of the project. It is not intended for you to work from, but rather as a visual, so you see how the working charts fit together.


Posted by Picasa

This next chart is the Edging Chart A (AKA Bramble.) I suggest that you print six copies and use a highlighter to mark one row of the repeat on each of six copies (there are six rows in the row repeat!) This will help you keep track of which Edge row you are on as you knit. You can move the chart marked with the row you finish to the bottom of the stack of sheets...


Posted by Picasa

Next you have Working Chart A. Please be sure you read all the pattern notes AND all my notes on each chart.


Posted by Picasa

Pattern Notes:
Please read the chart key carefully for special notes about stitches. This project begins as a center (neck) start triangle, much as Autumn in New York did. Do not use my modified Turkish Cast-on for this project. Instead use a standard provisional cast-on or a standard Turkish Cast-on. That is because this is not a garter stitch neck edge. We went over links for those when we started Autumn in New York, so check back if you want suggestions. There are also previous discussions on adding beads, including a step-by-step from early Veil of Isis posts.

There are two Chart As. One shows you the full layout. The second is a “working chart.” The other charts will be presented only as “working charts.” Only the first Chart A will show both halves of the triangle and the Edge Charts. All the following charts will only show half of the triangle and no Edge Charts. All charts will show the center stitch (which runs down the center back.) There is also an Edge “working chart.” Only right side (odd numbered) rows are shown ON ALL CHARTS. Even numbered rows are worked as defined in the chart Key. Essentially, knit the garter (3) stitch edges and purl the knit stitches. Chart A has a row repeat and pattern repeat marked. I did not knit any row repeats, but it is here for those of you who prefer to continue in the Rose Petal (Chart A) motif. You can continue and make the shawl as large as you like, adding a simple cast-off when you are ready. For those who choose to knit on through the charts, do not repeat these rows, but rather proceed to Chart B when I post it. I repeat: Do Not Keep Knitting Chart A! You will continue with the Edge Chart, following the row repeats until Chart D. On Chart B there is an alternative stitch block for one section of the chart. If you choose to use this alternative, use it through Charts B, B2 and B3. Once you complete Chart B3, you can return to Chart A row repeats, and add a few repeats if you want your piece larger. There are ABOUT 54 more rows to the pattern AFTER Chart B3 WITHOUT any extra repeats, so only add repeats if you want your shawl larger than the 54 rows that will follow. Calculate how large that will be by checking your own row gauge after you finish this weeks knitting. Be sure to consider your bead and yarn usage, because more rows will use more beads and yarn! You need a set of four double pointed needles and a circular needle in the same size, large enough to hold a bunch of stitches, which we will have towards the end. I am using a 32 inch circular.

Directions:
Using double pointed needles:
2 needles for step I and 4 needles for step II
Step I
-Cast-on 19 stitches using a provisional cast-on
-Row 1) knit 19, turn
-Row 2) Knit 3, purl 16, turn
Knit rows 1 and 2 a total of four times
-You will have 19 stitches on needle A
Step II
-Using a second double pointed needle, pick-up three stitches along the short edge of your piece and purl them. This is needle B, with 3 stitches.
-Using another double pointed needle, pick-up the 19 stitches from your provisional cast-on. Purl 16 and knit 3. This is now needle C, with 19 stitches.
Turn your work. The front is now facing you. Begin following the charts as follows:
-Knit Right Edge Chart row 1. Place a marker. You will have knit all the stitches from needle A and one stitch from needle B.
-Knit Chart A row 1. That is: Yarn-over, knit 1, yarn-over. Place a marker.
-Knit Left Edge Chart row 1. This will include one stitch from needle B and all the stitches from needle C (as shown in purple above.)
-Turn your piece and work a return row back. Be sure to maintain the garter stitch on either edge as shown on the charts.
-Continue following the Charts in sequence. Be sure to read all the notes.
-You should be able to switch from your double pointed needles to a circular needle after Chart A, row 25
Above, you can see the purple indicating where I switched to my circular needle (just after the second beaded round.) Once you complete Chart A, your piece should look like my piece, above. Take time this week to make the cast-on nice. It takes some care to get things set-up, but once you establish the pattern it should flow smoothly.


I'll be back next week with Chart B and maybe some pictures of my birthday goodies! Until then, knit on!

Saturday, February 7, 2009

American Beauty: Do you believe in swatching?

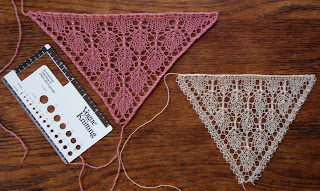
If you are here reading this post, chances are you are thinking about knitting yourself some roses for Valentine's Day. I am posting the American Beauty Chart Key (for the entire project) along with a swatch chart. The chart key will give you a modest idea of what is coming. The swatch is the "ground" motif for our project, and I call it Rose Petals.

When I was designing this piece, I started by looking for a symbol of Valentine's Day. I played with heart shapes and roses and this project is what developed. When I think of "American Beauty" a few things come to my mind. First are Roses, and in particular This Rose. The second is music, and in particular this music. The third is a movie, and in particular this movie. The third (visual) says it all. So I invite you to join me and wrap yourself in a bed of rose petals!

This pink swatch was knit with some left-over 2/24 yarn and silver-lined gold beads. This white swatch was knit with some Shetland cobweb weight and copper-lined clear beads. I would have used my project yarn, but I am already using it for the project and I didn't want to break it! That should tell you what I think about swatches! Not really...I actually swatch a great deal, but I didn't make a swatch for this project from my project yarn. So there. The point of the swatch is to give you a chance to try your yarn with your beads and see if they work for you.

Posted by Picasa

Review the Chart Key carefully. This is the only time I will post it and if you have any questionsyou can post them in the comments section. I will reply in kind and it will be our own FAQs, if you will.


To knit the swatch, cast-on four stitches. Turn your work and begin the chart at row 1. Only the right side (odd numbered) rows are charted. Even numbered rows are knit for the garter stitch and purled for everything else. Once you finish row 41, knit row 42 across and cast-off loosely. Soak in warm water and lay flat to block. Decide if you like the way your beads and yarn work together. Decide what size needles to use during this process. The choice is very individual.

I am trying a new technique to post my charts and I hope you enjoy them. I'll be back next week with our real cast-on. Until then, keep knitting!