Happy long weekend, for those of you in the USA. We are marking Memorial Day in the Northeast with glorious weather, at long last! I put together a really huge post for you today, because there were a few things I really wanted to cover. Let me start briefly (to mark Memorial Day) with the stitch marker:
 The Summer Sampler needs two markers. Use one after and before the three stitches of garter stitch along each edge, to remind you to maintain that. You might also use others if you choose, as we move into the various patterns, which don't all have the same repeats. On my project needles I am using small coiless safety pins. I slip a few seed beads on the pin for my amusement, and to distinguish one side from the other if need be. Many things can be used as stitch markers; you can use the coiless pins, a loop of smooth thread, rubber bands from your kid's orthodontist, plastic ones you buy at the yarn shop and finally, lovely ones you buy from a craft person or make yourself! At the end of this post, I will show you how I make totally lovely stitch markers. Jewelry for your needles...
Eunny Jang: Provisional cast-on like I do it (and I learned from EZ’s books.)
Fiona’s Knitting: Provisional cast-on
Stitch Diva: Chained cast-on
Any of these options will get what you needs, so take your choice and cast-on! Page four follows with full directions:
 If you glance back up to the picture, after the cast-on you will see the garter stitch section and the first spacer section. Page five and six follow, with full instructions for the spacer chart. I give you written along with charted direction for this pattern only, to help move you in the correct direction. The spacer is the only chart with significant activity on the wrong side rows, so don't let it intimidate you. It is easier than it looks.

Thanks to all of you who took my poll. It looks like the vast majority want pictures with each chart as I post them, so that is what I will do. There were several great suggestion about how I could post the picture elsewhere, and just put the link here on the blog, but all of those ideas will take me just enough extra time to deter me, so pictures here with the charts it will be!
Following is my stitch marker tutorial, for those of you interested!
 You first obtain special materials. I use sterling silver head pins. These are 22 gauge and 3 inches long. You don't need them this long, but the length makes it so easy to do nice work. I use 22 gauge for stitch markers to use with lace-weight yarn. I use larger gauge for heavier markers, but today I am making lace-weight markers. Above, I have coin pearls, two different smaller pearls, moonstones and amethysts, along with size 11 Japanese seed beads.
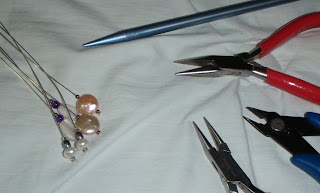 I use round-nose pliers, flat-nose pliers, a cutter and a mandrill (an old US 9 knitting needle.)
 I start with the goodies on the head-pin arranged the way I like them.
 Using the flat-nosed pliers, I make a right angle bend in the head-pin just the right distance from my goodies.
 Here you see the bend and where I placed it.
 Next, I take the round-nosed pliers and put a gentle curve in the head-pin.
 I extend the curve around my mandrill, using my fingers.
 I now use the flat-nosed pliers to grasp the new loop where it comes together, as I hold the end of the head-pin.
 I wrap the wire around the "shaft" of my marker with my hand. You can use a second pliers, but the hand gives me much better control over how the wraps lay (perfectly, right next to each other.)
 I use my cutters to snip the extra wire off once the wraps are done. Cut right next to the last wrap.
 Lastly, I use the flat-nosed pliers to push the cut end of the wire in, so I can't feel it. If you don't do that, it might snag your yarn. Be very careful not to break the seed bead when you do this step.
 Now they are ready for gifting! Set one is my coin pearls.
 Set two are moonstones and amethysts.
 Set three are grey and white pearls.
 Some eye candy from my collection, we have turquoise on the left and coral and turquoise on the right.
 Here we have abalone fish and silver.
 Here we have assorted stones and silver.
 Here is part of a really large set I made using Italian glass and silver. Each one is a different color. Some are currently occupied on other projects...
 Finally, these are some kind of opal with silver. I hope you like my markers, and make a set for yourself. Just make two and dress up your Summer Sampler needles!
 I'll be back next week with pattern one of the Sampler project. Happy knitting!
What pretty stitch markers! I make my own, too, but always love to see what other knitters come up with. There's so much individuality, and inspiration in it. :o)
ReplyDeleteI thought I'd also share how I'm saving the project image files. I've got a utility called PrimoPDF, which allows me to save things to PDF format. It requries that you have the Microsoft .NET framework installed on your computer, so this won't work for everyone. Anyway, as you "print" things to a PDF file with PrimoPDF, you can specify the same file name for several files, and instead of overwriting the previous file, you can append to it. So, I now have a file for the Summer Sampler with all of the images in it.
Hope this helps!
Thank you for the description of how to make the markers. I have wanted to make some for myself.
ReplyDeleteThose stitch markers are fabulous! I wish I had the patience to make some myself, but I am worthless with a pair of pliers. Lucky duck you are!
ReplyDeleteI love the stitch markers!
ReplyDeleteI keep coming back everyday, wishfully thinking you might post pattern 1 early. I know what I will find, yet I keep coming back and looking(laughing at myself)
ReplyDeleteKim
I love your stitch markers! They are so nicely made and so pretty that I'm sure they are a pleasure to knit with.
ReplyDelete